· Kalpa Madhushan · security · 2 min read
Setting Up a Two-Subnet Network with DHCP and Router using VirtualBox
A step-by-step walkthrough of my first experience solving capture the flag security challenges, focusing on file descriptors and hash collisions.
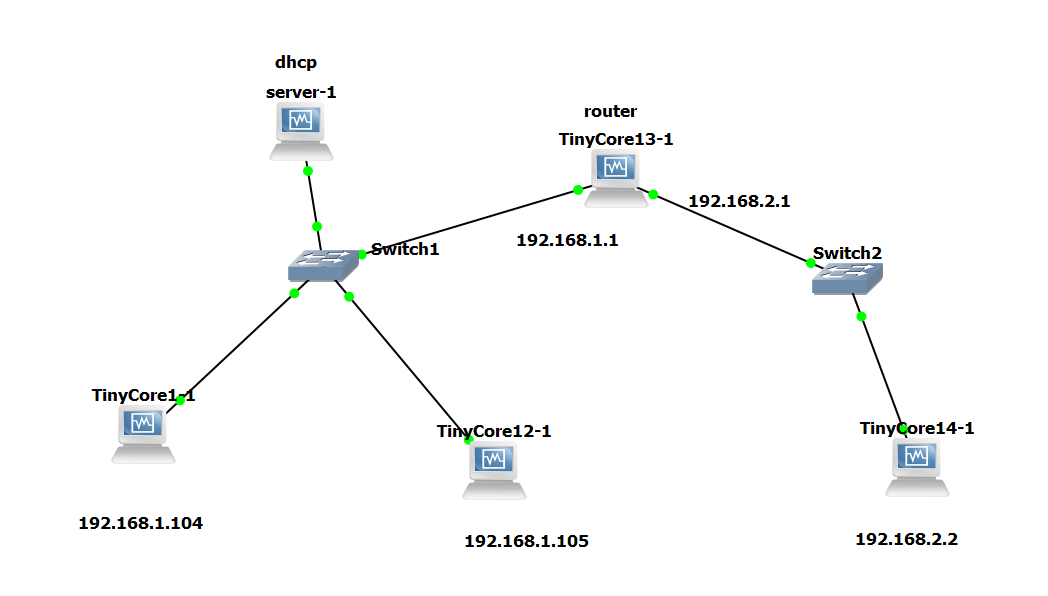
This guide outlines the steps to configure a two-subnet virtual network environment using VirtualBox. It includes setting up a DHCP server, assigning static IPs, and enabling routing between subnets.
Step 1: Configure DHCP Server (using isc-dhcp-server)
Install DHCP Server (on Ubuntu/Debian)
sudo apt update
sudo apt install isc-dhcp-server
Edit DHCP Configuration
sudo nano /etc/dhcp/dhcpd.confAdd the following:
subnet 192.168.1.0 netmask 255.255.255.0 {
  range 192.168.1.100 192.168.1.150;
  option routers 192.168.1.1;
  option subnet-mask 255.255.255.0;
  option domain-name-servers 8.8.8.8;
}
Assign Static IP to DHCP Server (optional but recommended)
sudo ifconfig eth0 192.168.1.10 netmask 255.255.255.0 upStart the DHCP Server
sudo systemctl restart isc-dhcp-server
✅ Tip: Ensure all VMs (except router) have different MAC addresses to receive unique DHCP IPs. In VirtualBox, go to VM Settings > Network > Advanced > Generate new MAC.
Step 2: Configure the Router (tinycore13-1)
This VM acts as a bridge between the two networks.
Assign IP to Interface 1 (Network 1)
sudo ifconfig eth0 192.168.1.1 netmask 255.255.255.0 upAssign IP to Interface 2 (Network 2)
sudo ifconfig eth1 192.168.2.1 netmask 255.255.255.0 upEnable IP Forwarding
sudo sysctl -w net.ipv4.ip_forward=1
Step 3: Configure tinycore14-1 (Network 2 Host)
Assign IP manually
sudo ifconfig eth0 192.168.2.2 netmask 255.255.255.0 upSet Default Gateway to Router’s eth1
sudo route add default gw 192.168.2.1
Step 4: Client Configuration (Network 1)
- Clients in Network 1 get IPs from the DHCP server.
- Default gateway is provided automatically via DHCP (
192.168.1.1).
You don’t need to manually configure gateway or IP on these machines.
Step 5: Verifying the Setup
From a Network 1 client:
ping 192.168.2.2From Network 2:
ping 192.168.1.100 # or any DHCP-assigned IP
Optional: Use Netplan for Static IPs (Ubuntu systems)
Instead of ifconfig, you can configure static IPs using Netplan.
Example config for /etc/netplan/01-netcfg.yaml:
network:
  version: 2
  ethernets:
    eth0:
      addresses: [192.168.2.2/24]
      gateway4: 192.168.2.1
      nameservers:
        addresses: [8.8.8.8, 8.8.4.4]
Then apply:
sudo netplan applySummary
- DHCP Server gives IPs to Network 1 clients and sets
192.168.1.1as the default gateway. - Router (tinycore13-1) connects both subnets and performs IP forwarding.
- tinycore14-1 is manually configured in Network 2.
- Once MAC addresses are unique and IPs are set, devices from both networks can communicate using ping.