· Kalpa Madhushan · system administration · 3 min read
How to Install Ubuntu Desktop over Network Boot (PXE) using Pop!_OS
Learn how to set up a PXE server on Pop!_OS to install Ubuntu Desktop on client machines using UEFI network boot with dnsmasq and NFS.
Installing Ubuntu Desktop Over Network Boot (PXE) Using Pop!_OS
This guide explains how to install Ubuntu Desktop 22.04 over the network using PXE boot (UEFI, IPv4). The PXE server runs Pop!_OS, using:
- dnsmasq → DHCP + TFTP
- GRUB EFI → PXE bootloader
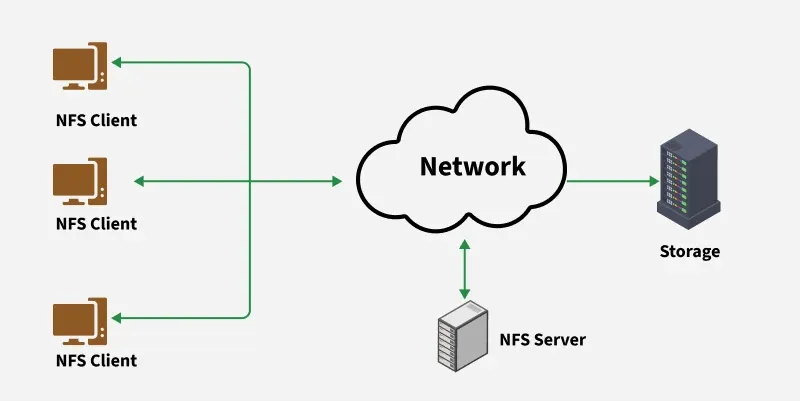
- NFS → serving Ubuntu ISO contents
This setup was tested and confirmed working.
Network Overview
| Component | Value |
|---|---|
| PXE Server OS | Pop!_OS |
| PXE Server IP | 192.168.50.1/24 |
| Client Boot Mode | UEFI |
| PXE Protocol | IPv4 |
| Ubuntu Version | 22.04 Desktop |
| Services Used | dnsmasq, GRUB, NFS |
STEP 1 — Prepare Pop!_OS (PXE Server)
1. Install required packages
sudo apt update
sudo apt install dnsmasq grub-efi-amd64-bin wget nfs-kernel-server -y
⚠️
tftpd-hpais NOT needed. dnsmasq already provides TFTP.
2. Create PXE directories
sudo mkdir -p /srv/tftp/boot/grub
sudo mkdir -p /srv/iso
3. Download Ubuntu Desktop ISO
cd /srv/iso
sudo wget https://releases.ubuntu.com/22.04/ubuntu-22.04.4-desktop-amd64.iso
If the download fails, download via browser and move it to /srv/iso.
4. Mount the ISO
sudo mkdir -p /mnt/ubuntu
sudo mount -o loop /srv/iso/ubuntu-22.04.4-desktop-amd64.iso /mnt/ubuntu
5. Copy kernel and initrd
sudo mkdir -p /srv/tftp/boot
sudo cp /mnt/ubuntu/casper/vmlinuz /srv/tftp/boot/
sudo cp /mnt/ubuntu/casper/initrd /srv/tftp/boot/
STEP 2 — Configure GRUB for UEFI PXE
1. Create GRUB EFI binary
sudo grub-mknetdir --net-directory=/srv/tftpThis creates:
/srv/tftp/boot/grub/x86_64-efi/core.efi2. Create GRUB configuration
sudo nano /srv/tftp/boot/grub/grub.cfgPaste:
set timeout=5
set default=0

menuentry "Install Ubuntu Desktop (PXE)" {
    linux /boot/vmlinuz boot=casper netboot=nfs nfsroot=192.168.50.1:/mnt/ubuntu ip=dhcp ---
    initrd /boot/initrd
}
🔑
192.168.50.1must be the PXE server’s IP.
STEP 3 — Assign Static IP to PXE Interface
sudo ip addr add 192.168.50.1/24 dev eno1
sudo ip link set eno1 up
If eno1 does not work, try enp3s0.
Verify:
ip a | grep eno1Expected:
inet 192.168.50.1/24STEP 4 — Configure dnsmasq (DHCP + TFTP)
Edit the main config file (important on Pop!_OS):
sudo nano /etc/dnsmasq.confPaste:
interface=eno1
bind-interfaces

dhcp-range=192.168.50.10,192.168.50.50,12h
dhcp-option=3,192.168.50.1
dhcp-option=6,192.168.50.1

enable-tftp
tftp-root=/srv/tftp

dhcp-match=set:efi-x86_64,option:client-arch,7
dhcp-boot=tag:efi-x86_64,boot/grub/x86_64-efi/core.efi
📌
/etc/dnsmasq.d/may be ignored unless explicitly enabled. Using/etc/dnsmasq.confavoids this issue.
STEP 5 — Disable systemd-resolved (Critical Fix)
dnsmasq must own port 53. Pop!_OS runs systemd-resolved by default, which breaks PXE.
1. Hard stop and mask systemd-resolved
sudo systemctl stop systemd-resolved
sudo systemctl disable systemd-resolved
sudo systemctl mask systemd-resolved
sudo killall systemd-resolved
2. Fix /etc/resolv.conf
sudo rm /etc/resolv.conf
echo "nameserver 1.1.1.1" | sudo tee /etc/resolv.conf
3. Restart dnsmasq
sudo systemctl restart dnsmasq
sudo systemctl status dnsmasq
4. Verify ports
Check DNS (53):
sudo ss -tulpn | grep :53Expected: dnsmasq
Check DHCP (67):
sudo ss -u -a -p | grep 67Expected: dnsmasq listening
STEP 6 — TFTP Notes (Important)
dnsmasq already provides TFTP:
dnsmasq-tftp: TFTP root is /srv/tftpTherefore:
sudo systemctl stop tftpd-hpa
sudo systemctl disable tftpd-hpa
Port 69 conflicts are normal if tftpd-hpa is installed.
STEP 7 — Permissions for TFTP
sudo chown -R nobody:nogroup /srv/tftp
sudo chmod -R 755 /srv/tftp
STEP 8 — Configure NFS (Required for Installer)
1. Install NFS server
sudo apt update
sudo apt install nfs-kernel-server
2. Export the mounted ISO
sudo nano /etc/exportsAdd:
/mnt/ubuntu 192.168.50.0/24(ro,sync,no_subtree_check,no_root_squash)Apply:
sudo exportfs -ra
sudo systemctl enable --now nfs-kernel-server
Verify:
showmount -e 127.0.0.1Expected:
/mnt/ubuntu 192.168.50.0/24STEP 9 — BIOS / UEFI Client Settings
On the client machine:
- Disable Secure Boot
- Enable Network Boot / PXE
- Boot Mode: UEFI only
- Enable F12 Boot Menu
- Some laptops require setting a Supervisor Password to change these options
STEP 10 — Boot and Install Ubuntu
- Connect Ethernet cable
- Power on client
- Press F12
- Select Network Boot (IPv4)
- GRUB menu appears
- Choose Install Ubuntu Desktop (PXE)
Ubuntu installer starts and installs normally 🎉
Final Notes
- PXE works best with IPv4
- dnsmasq handles DHCP + TFTP
- NFS serves the Ubuntu ISO
tftpd-hpais unnecessarysystemd-resolvedmust be disabled on Pop!_OS